

Do you suffer from joint pain; rotator cuff, tennis elbow, carpal tunnel, or other joint pain? Rotator cuff and tennis elbow are two joint issues I have personally struggled with. This 3 part series will discuss how you can begin to heal your joint pain. Part 1 dealt with understanding how healthy joints function and what can go wrong. Here, in Part 2, I will show you how to assess your joint health to determine which joints need intervention to prevent injury. Finally, Part 3 will provide methods for beginning to heal joint pain.
Losing Flexibility Because We Age is a MYTH
In part one of this series I mentioned my fascination at watching my grandson, who is not yet two years old, effortlessly drop into a flat-footed, and perfectly straight-backed, full squat. It reminded of the perfect flexibility and posture we are all born with. It is a myth that we lose flexibility because we age. We lose flexibility because we stop moving! You can easily find examples of individuals in their 70’s, 80’s, and even 90’s who have maintained their flexibility and strength. 83-year-old Australian yoga instructor and grandmother Bette Calman is a perfect example.

“Connective tissue shares with many other gels a phenomenon called thixotropy: It becomes more fluid when it is stirred up, and more solid when it sits without being disturbed. There can be no doubt that poor nutrition and sedentary habits weaken all the connective tissues of the body, stiffen them, and significantly accelerate their biological aging. ” 1 Put simply, when it comes to joint mobility; move it or lose it.
Simple Movements to Test Your Joint Mobility
Do not attempt any of these movements if you fear they will cause you injury. We are not medical professionals. The views and opinions expressed on this blog are purely our own and are not intended to diagnose, treat, cure or prevent any disease. Always consult your doctor before making any dietary or exercise changes.
The Wrist
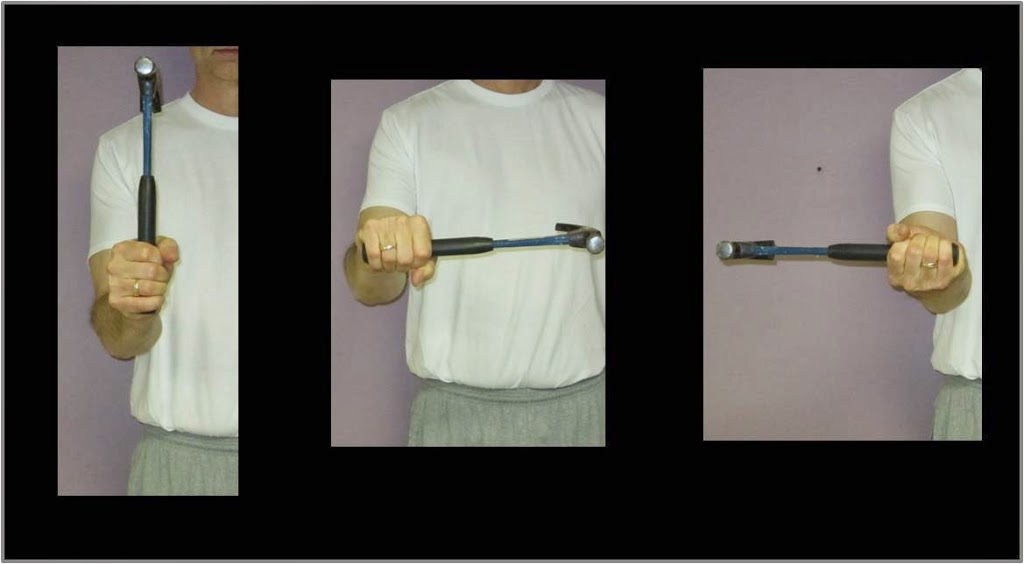
In this movement we grasp a hammer or similar object and hold our elbow at 90 degrees. Then we turn our palm down. Notice how far you are able to rotate your wrist. Note any pain you feel. Now return to the starting position. Now turn your palm upward. Again, notice how far you are able to rotate your wrist and whether you feel any pain. Repeat for your other wrist. It’s particularly important to note differences between the mobility of each wrist. Mobility restrictions and pain are often the result of repetitive use or disuse and differences between one side of the body and the other can often indicate what daily activity or lack thereof may be causing a problem. If you can reach the full range of motion shown in the picture without pain your wrist mobility is intact. If not, you will have identified a joint in need of healing.
The Shoulder
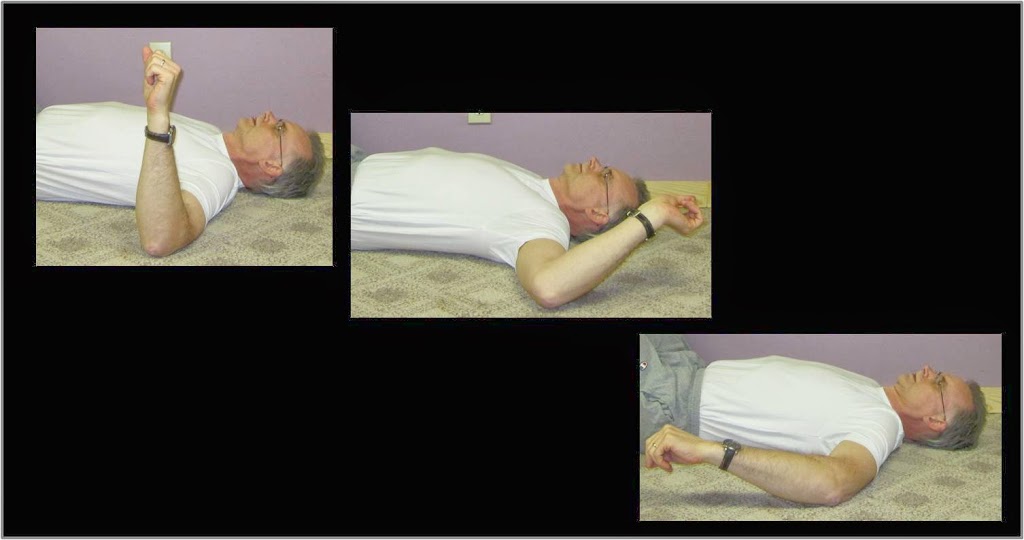
Lie on a bed or floor and place your arm out perpendicular from your body. Bend your elbow to 90 degrees. Now let your arm fall backwards as far as you can pain free. Notice how easily your shoulder rotates. Note any pain you feel. Notice how close your hand is to the floor. Now return your arm to the starting position. Now let you arm fall forward as far as possible without pain. Do not let your shoulder rise off the floor, and note how close your hand can come to the floor. You can see in the photo my mobility is somewhat limited in both positions. Repeat for your other shoulder. It’s particularly important to note differences between the mobility of each shoulder. Mobility restrictions and pain are often the result of repetitive use or disuse and differences between one side of the body and the other can often indicate what daily activity or lack thereof may be causing a problem. If you feel pain in the extreme range of the motion, or are unable to move very far into the extreme range of the motion you will have identified a joint in need of healing.
The Hips, Knees, and Ankles
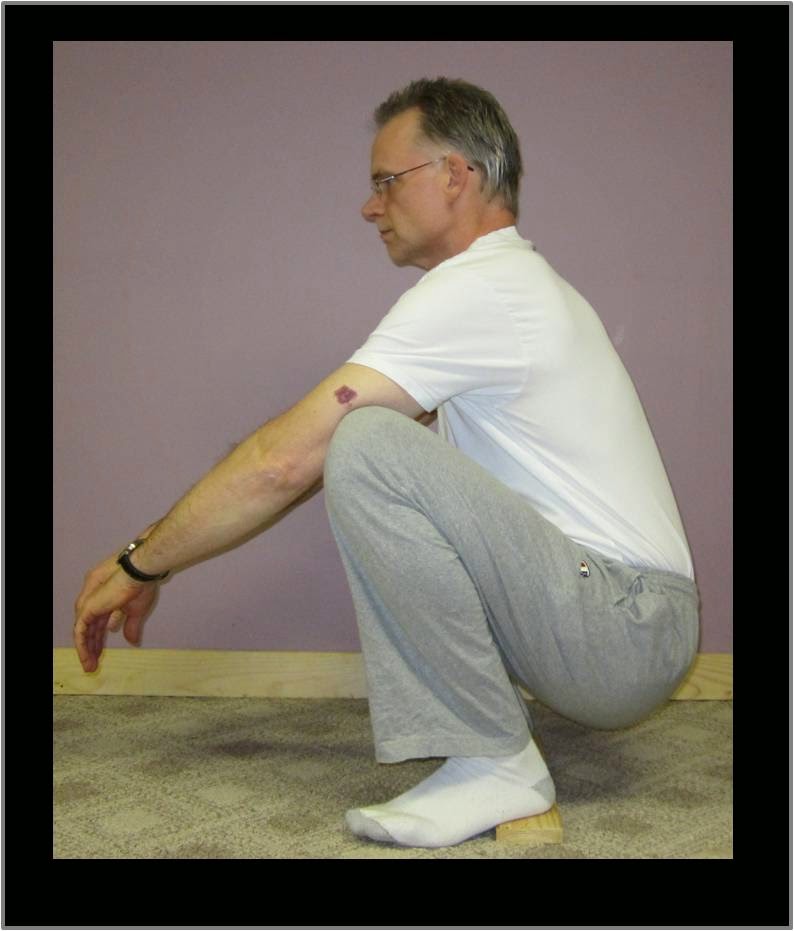
The full squat is an excellent test of hip, knee, and ankle mobility. You’ll note in the photo that I can only achieve the full squat with a small board under my heels. Lack of flexibility in my ankles, specifically my calf muscles, causes my heels to rise off the floor in the bottom position. The full squat involves placing your feet about shoulder width apart, toes pointed slightly outward, bending your knees with a straight or only slightly rounded back, and then descending until your thighs rest against your calves. Your torso ends up between your knees with your arms extended forward for balance. Weakness or stiffness in hips, knees, or ankles will prevent you from achieving the full squat. If the thought of even attempting it fills you with trepidation, then consider sitting down onto chairs, steps, or stools of progressively lower heights. This will give you a measure of safety and indicate the extent of your range of motion. Note were you feel pain, stiffness, or restriction.
In Part 3 of this series we’ll discuss methods for beginning to heal joint pain.
Written by Peter Wright
Photo 1 – Wayne, Michael (Author). (2010), http://www.lowdensitylifestyle.com/media/uploads/2010/01/bette-again.jpg
1 Juhan, Deane, “Job’s Body”, Pg 68, c1987

Nutritional Therapy and GAPS Diet Practioner at Healing Center of Maine
I’m on a mission to help you prevent and reverse chronic illness by utilizing nutrition to restore your body’s natural balance.
Contact me directly for a free 30 minute consultation.
Contact me directly for a free 30 minute consultation.
Latest posts by Peter Wright, NTP, CGP (see all)
- Dehydrated Broth – Making It Easy to Drink Broth Every Day! - March 11, 2017
- Lose 10 lbs DURING the Holidays - November 19, 2016
- Finding Good Oils - February 7, 2016
Thanks for the pictures. It really helps me to better understand the movements.
I found this post on Marks Daily Apple. A great test for shoulder mobility.
Dave Mayo ,Junior Member,Join Date Nov 2011,Posts 11
Take the hand of your injured arm and place it on the opposite shoulder. Raise your elbow from your chest to your forehead while keeping your hand on the opposite shoulder. Does it hurt at the point of the injured shoulder? Do the other side as well. This is a test for subacromial impingement and is typical in people who train too many pressing movements. Good training practice is to match pushing and pulling both in volume and along the same planes of motion. Not doing so causes the shoulder joint to sit improperly and eventually leads to problems both in pain and function. The hard part about dealing with it is you need to modify everyday activities.
Whenever you are in a seated position you need to make sure you are sitting up tall with your scapula retracted and depressed (PUll them behind you and toward your ass)
When you are driving in the car your head needs to be back against the head rest.
If you sleep on your side you need to stack pillows so your head is supported and you are not lying on a jammed shoulder.
Focus on tall posture at all times
It could also be tendonitis, an RC tear, bursitis, etc. If you test positive for SA impingement you are going to need to fix that before the other stuff anyway because it will just come back. Healthy shoulders don’t hurt.